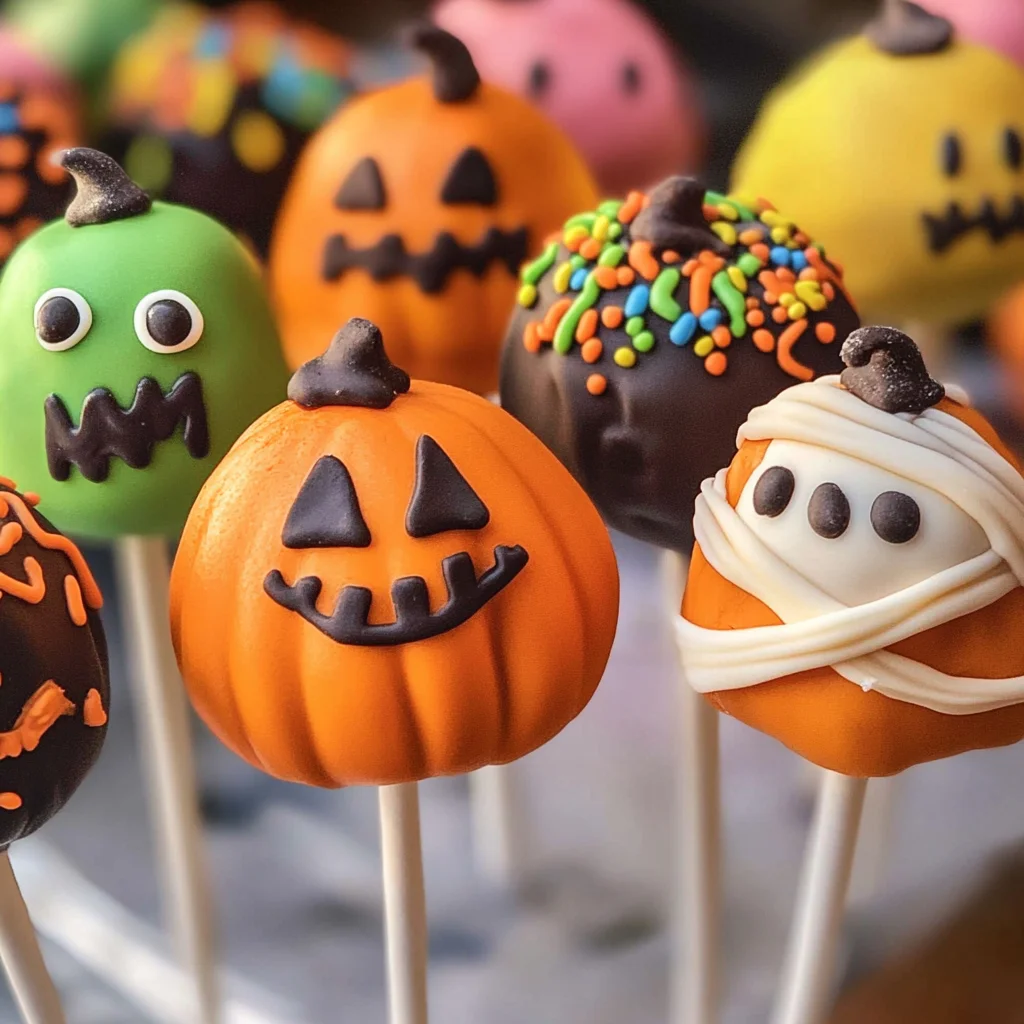
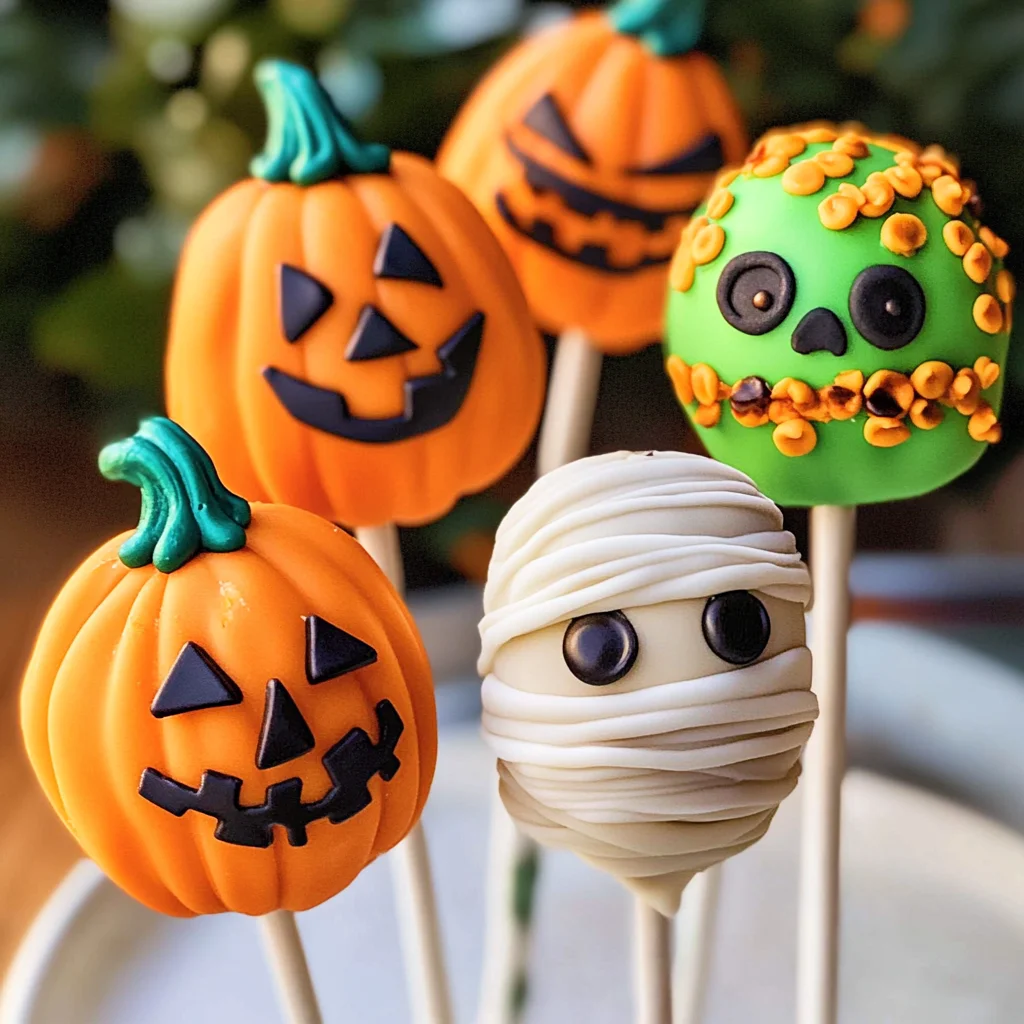
Halloween Cake Pops
Halloween Cake Pops are the perfect treat for your spooky celebrations! These delightful bite-sized cakes can be decorated as pumpkins, Frankensteins, and mummies, making them a fun activity for kids and adults alike. Ideal for Halloween parties, school events, or just a festive dessert, these cake pops bring joy to any occasion with their creativity and delicious flavor.
Why You’ll Love This Recipe
- Easy to Make – With simple steps and readily available ingredients, you’ll whip these up in no time.
- Customizable Designs – Decorate them as you like! Whether it’s pumpkin faces or spooky mummies, the options are endless.
- Fun for All Ages – Perfect for kids to help with decorating, making this a great family activity.
- Perfect Party Treat – These cake pops are easy to serve and enjoy at any gathering, ensuring your guests have a memorable experience.
- Deliciously Versatile – Use chocolate or vanilla cake flavors to cater to everyone’s taste preferences.
Tools and Preparation
Before diving into the Halloween Cake Pops recipe, gather the necessary tools. Having everything ready will make the process smoother and more enjoyable.
Essential Tools and Equipment
- Mixing bowl
- Electric mixer
- 13 x 9 inch cake pan
- Baking spray
- Refrigerator
- Microwave-safe bowl or double boiler
- Cake pop sticks
Importance of Each Tool
- Electric mixer – Makes blending the ingredients quick and effortless, ensuring a smooth batter.
- Refrigerator – Chilling the cake balls is crucial for maintaining shape while you dip them in Candy Melts.
Ingredients
Add these spooky cake pops to your next Halloween party. Made with vanilla or chocolate cake, decorate these bite-sized pieces of cake for Halloween including a Pumpkin, Frankenstein, and a Mummy.
For the Cake
- 1 box Favorite cake mix
- 1 3.4 oz box instant pudding mix
- 4 eggs
- 1 cup water
- 1/3 cup vegetable oil
For the Frosting and Coating
- 1 cup Frosting
- Candy Melts
Toppings
- Sprinkles
- Candy eyes
How to Make Halloween Cake Pops
Step 1: Preheat the Oven
Preheat your oven to 350°F. Spray your 13 x 9 pan with baking spray so that the cake does not stick.
Step 2: Prepare the Batter
In a large bowl:
1. Combine the cake mix, pudding mix, eggs, water, and oil.
2. Beat at medium speed for about 2 minutes until well mixed.
3. Pour into the lightly greased cake pan.
Step 3: Bake the Cake
Bake for 30-40 minutes or until a toothpick inserted in the center comes out clean. Allow it to cool in the pan for about 10 minutes before transferring it to a wire rack.
Step 4: Crumble the Cake
Once cooled:
1. In a large bowl, crumble the entire cake using your hands until no large chunks remain.
2. You can also use two forks to make this easier.
Step 5: Mix with Frosting
Add the frosting:
1. Mix with your fingers until thoroughly combined.
2. The mixture should hold together when formed into balls.
Step 6: Shape into Balls
Form small balls from the mixture. Aim for uniform sizes so they look great when presented.
Step 7: Chill Before Dipping
Chill in the refrigerator for at least 2 hours; this helps them firm up before dipping.
Step 8: Melt Candy Melts
Melt your Candy Melts.
1. Use a microwave-safe bowl and heat in 30-second intervals at 50% power until fully melted.
2. Alternatively, use a double boiler on low heat.
Step 9: Insert Sticks into Cake Balls
Dip one end of each stick into melted Candy Melts:
1. Insert it into each chilled cake ball.
2. Let set; you can speed this up by placing them in the freezer for about 20 minutes.
Step 10: Coat Cake Pops
Once firm:
1. Dip each cake pop fully into melted Candy Melts.
2. Allow excess candy coating to drip off before proceeding.
Step 11: Decorate Your Pops
Sprinkle on your decorations such as chopped candy, nuts, or sprinkles while still wet to ensure they stick!
Enjoy your delightful Halloween Cake Pops!
How to Serve Halloween Cake Pops
Serving Halloween Cake Pops can be a fun and creative way to add a festive touch to your celebrations. These delightful treats can be presented in various ways that will impress your guests and make your Halloween party memorable.
Creative Table Displays
- Use a themed cake stand to elevate the pops, making them the centerpiece of your dessert table.
- Arrange them in small jars filled with candy corn for a colorful and spooky look.
Individual Treat Bags
- Package each cake pop in clear bags tied with orange and black ribbons for easy grab-and-go treats.
- Include a cute tag with a spooky message or the name of the flavor.
Fun Party Favors
- Gift cake pops as party favors for guests to take home. Wrap them individually for an extra special touch.
- Create a mixed bag of different designs (Pumpkin, Frankenstein, Mummy) for variety.
Themed Platter
- Arrange cake pops on a platter decorated with Halloween-themed items like plastic spiders or faux cobwebs.
- Use colored napkins that match the themes of the cake pops for added flair.
How to Perfect Halloween Cake Pops
Perfecting Halloween Cake Pops can elevate their appearance and taste, making them irresistible at any gathering. Here are some essential tips to achieve perfection.
- Use high-quality ingredients: Opt for premium cake mixes and frosting for the best flavor and texture.
- Chill the cake balls: Ensure they are firm before dipping; this helps maintain their shape during coating.
- Melt Candy Melts properly: Heat gradually to avoid burning; stirring frequently ensures smoothness.
- Decorate creatively: Don’t shy away from using various toppings like nuts or sprinkles that fit your theme.
- Practice dipping technique: Dip quickly but gently; tapping off excess coating prevents drips.
- Store correctly: Keep leftover cake pops refrigerated in an airtight container to maintain freshness.
Best Side Dishes for Halloween Cake Pops
Pairing side dishes with your Halloween Cake Pops can enhance your festive spread. Here’s a list of delicious options that complement these sweet treats perfectly.
-
Witch’s Finger Veggies
Crunchy celery sticks topped with almond slices make perfect “witch’s fingers.” -
Spooky Cheese Platter
A selection of cheeses cut into ghost shapes, served with crackers for snacking. -
Monster Fruit Cups
Colorful fruit cups featuring grapes, strawberries, and melon balls arranged as monster faces. -
Ghostly Deviled Eggs
Classic deviled eggs dressed up with olive “eyes” for a spooky twist. -
Pumpkin Soup Shots
Smooth pumpkin soup served in shot glasses garnished with pumpkin seeds, perfect for sipping! -
Creepy Pasta Salad
Rotini pasta mixed with olives and cherry tomatoes, creating a salad that looks like creepy critters. -
Mummy Meatballs
Mini meatballs wrapped in pastry strips to resemble mummies—great finger food! -
Haunted Hummus Platter
A vibrant hummus served with assorted veggies cut into fun shapes for dipping.
Common Mistakes to Avoid
Creating Halloween Cake Pops can be a fun experience, but there are some common mistakes you should steer clear of.
- Boldly skip chilling – Not chilling the cake balls can lead to melting during the dipping process. Always chill for at least 2 hours before coating.
- Boldly overmixing frosting – Overmixing can make the cake balls too soft and difficult to shape. Mix just until combined for the best texture.
- Boldly ignoring cake quality – Using low-quality cake mix can affect taste and texture. Opt for a brand you trust for delicious results.
- Boldly rushing melting Candy Melts – Melting too quickly can cause burns or clumping. Use short intervals in the microwave or low heat on the stove.
- Boldly skipping decorations – Forgetting toppings can make your pops look less festive. Be creative with sprinkles and candy eyes to enhance presentation.
Storage & Reheating Instructions
Refrigerator Storage
- Store in an airtight container to maintain freshness.
- Cake pops can last up to 1 week in the fridge.
Freezing Halloween Cake Pops
- Place them in a single layer on a baking sheet until frozen, then transfer to a freezer-safe container.
- They can be frozen for up to 3 months.
Reheating Halloween Cake Pops
- Oven – Preheat the oven to 350°F and warm the pops for about 5 minutes.
- Microwave – Heat individual cake pops in 10-second intervals until slightly warm; avoid overheating.
- Stovetop – Use a double boiler on low heat to gently warm without melting completely.
Frequently Asked Questions
Here are answers to some common questions about making Halloween Cake Pops.
Can I use any cake mix for Halloween Cake Pops?
Yes, you can use any flavor of cake mix you like! Vanilla and chocolate are popular choices, but feel free to get creative.
How do I make my Halloween Cake Pops more festive?
You can decorate your Halloween Cake Pops with themed sprinkles, edible glitter, or candy eyes. Get imaginative with your designs!
How long do Halloween Cake Pops last?
When stored properly in an airtight container, they last up to one week in the refrigerator and up to three months in the freezer.
What are some alternatives for Candy Melts?
If you prefer, you can use white chocolate or colored chocolate chips as an alternative to Candy Melts for coating your cake pops.
Can I make these cake pops ahead of time?
Absolutely! You can prepare and freeze them ahead of time. Just thaw them before decorating when you’re ready to serve.
Final Thoughts
These Halloween Cake Pops are not only delightful treats but also an engaging activity for your next celebration. Their versatility allows you to customize flavors and decorations according to your preferences. Try them out and bring some spooky fun into your festivities!
Halloween Cake Pops

Get ready to impress your guests with these delightful Halloween Cake Pops! Perfect for any Halloween celebration, these bite-sized treats are not only delicious but also a creative activity for the whole family. Whether you decorate them as spooky pumpkins, playful Frankensteins, or cute mummies, they will surely add a festive flair to your party. Made with simple ingredients and easy steps, these cake pops are a fun way to celebrate the season. Enjoy the versatility of flavors by choosing between chocolate or vanilla cake, and let your imagination run wild with decorations!
- Prep Time: 30 minutes
- Cook Time: 40 minutes
- Total Time: 1 hour 10 minutes
- Yield: Approximately 20 servings 1x
- Category: Dessert
- Method: Baking
- Cuisine: American
Ingredients
- 1 box favorite cake mix
- 1 3.4 oz box instant pudding mix
- 4 eggs
- 1 cup water
- 1/3 cup vegetable oil
- 1 cup frosting
- Candy melts (for coating)
- Sprinkles
- Candy eyes
Instructions
- Preheat oven to 350°F and spray a 13 x 9-inch pan with baking spray.
- In a large bowl, mix cake mix, pudding mix, eggs, water, and oil at medium speed for about 2 minutes. Pour into the prepared pan.
- Bake for 30-40 minutes until a toothpick comes out clean. Cool in the pan for 10 minutes before transferring to a wire rack.
- Once cooled, crumble the cake into fine pieces in a bowl. Mix in frosting until the mixture holds together.
- Form small balls from the mixture and chill in the refrigerator for at least 2 hours.
- Melt candy melts in a microwave-safe bowl or double boiler until smooth.
- Dip one end of each stick into melted candy and insert into chilled cake balls; freeze for about 20 minutes.
- Dip each cake pop fully into melted candy melts, allowing excess to drip off.
- Decorate immediately with toppings while still wet.
Nutrition
- Serving Size: 1 cake pop (45g)
- Calories: 150
- Sugar: 15g
- Sodium: 130mg
- Fat: 7g
- Saturated Fat: 2g
- Unsaturated Fat: 5g
- Trans Fat: 0g
- Carbohydrates: 21g
- Fiber: <1g
- Protein: <2g
- Cholesterol: 30mg